Follow Along! (Quick Video Guide)
5-Step Quick Setup Flow
Enable Service
Accessibility ON
Capture Screen
Saved to download
Add Command
Color & click coords
Start Macro
Via notification bar
Press Home
Run in background!
3 Essential Rules to Know
1. Top-Down Search & Loop Reset
The app evaluates commands sequentially from top to bottom. When a condition triggers a click, subsequent commands are skipped and the loop resets to #1 immediately.
Ex: If command #8 triggers out of 10 → #9 and #10 are skipped, resetting straight to #1.
2. Screen Idle Wait (Power Saving)
When there is zero change on the screen, the engine idles to preserve device battery.
A subtle screen change (e.g., status bar clock or network icon blinking) triggers evaluation. (*** Enabled when Dot function runs ***)
3. Press Home to Lower Background
After tapping Start in the notification bar, press your smartphone's Home button to send the macro app to the background while target apps run.
💡 8 Essential Android Setup Tips
On Android 14+ devices, when prompted for screen recording permission, always choose [Entire screen]. Selecting "Single app" prevents pixel detection across different screens.
Grant [Display over other apps] in phone settings to display the on-screen Floating HUD Controller (Play/Stop) and the Magnifier Loupe Lens.
On Android 13+ devices, you must allow notification permissions on first launch to enable the status bar control actions (pause/stop) and keep background automation active.
Blue light filters tint screen pixels yellow, causing RGB color matching to fail. Please turn off Eye Comfort Shield during capture and execution.
Go to phone [Settings] → [Apps] → [Autonomous] → Tap 3 dots (⋮) in top right → [Allow restricted settings] to enable the accessibility toggle.
In App Info → Battery, change from "Optimized" to [Unrestricted] to prevent the OS from killing long-running automations.
Changing phone resolution or display zoom offsets touch coordinates. Keep the exact same screen settings used during capture.
Screen capture screenshots and exported backup files stored in the Download folder are permanently preserved and will NOT be deleted if you uninstall the app. (※ Note: In-app command lists reset upon uninstall, so export important macros to backup files anytime.)
Detailed Permissions & Command Setup
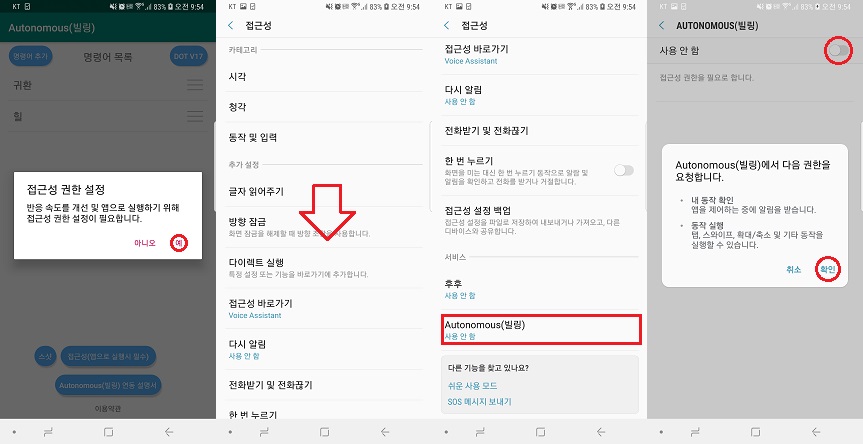
Enable Accessibility Permission
Go to Android [Settings] → [Accessibility] → [Installed apps/services], select [Autonomous (매크로)], and turn the toggle switch to [ON].
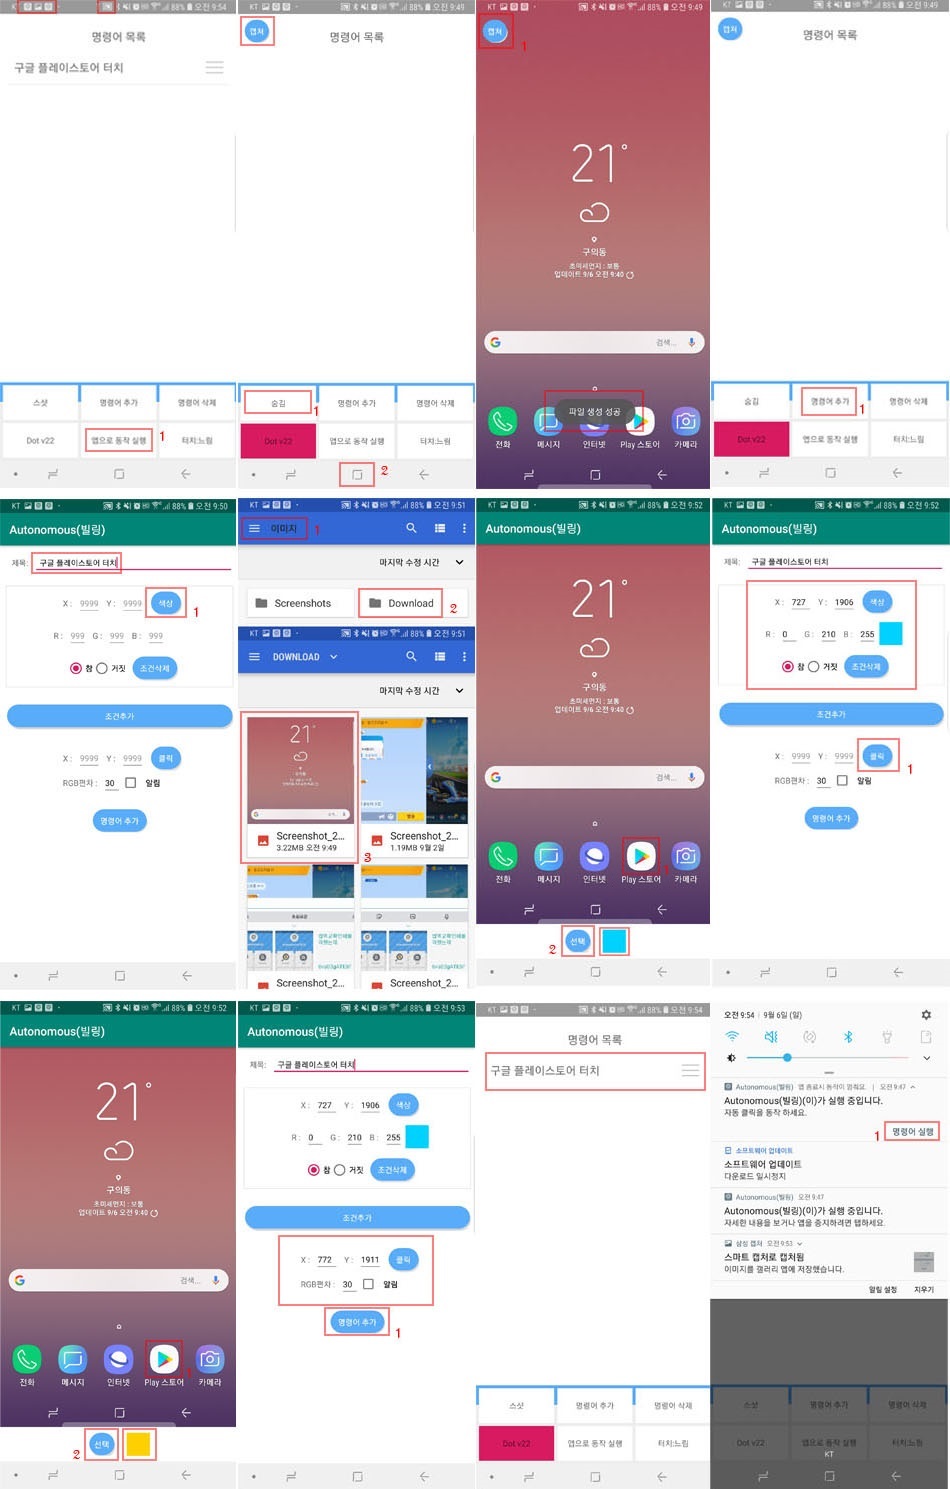
Command Setup & Pixel Matching (Quick 6-Step Tutorial)
How to configure real-time pixel matching so touches trigger automatically when exact colors appear on your screen.
Open the app → tap [Start Service] → switch to target screen → tap [Capture] in the notification drawer.
Download folder and are NOT deleted even if you uninstall the app.
Return to Autonomous → tap [Add Command] → tap [Color] → choose your screenshot from the Download folder.
Tap the exact icon or pixel on the screenshot to monitor → tap [Select] to automatically register coordinates (X, Y) and RGB color values.
Tap the [Click] button → tap the precise screen location where the automatic tap should occur → tap [Select].
Enter a title for the command and tap [Save Command] at the bottom to register it to your active list.
Pull down your Android notification drawer → tap [Execute Command] → press your phone's Home button to begin automated tapping!
View Complete 12-Step Screenshot Walkthrough (Expand)
Landscape Screen Orientation Fix
Launch the app while holding your device in landscape mode before taking screenshots and running automations to ensure touch coordinates align 100% accurately.
* Caution *
Android landscape orientation has two directions (clockwise vs counter-clockwise). Always place your phone in the exact same rotation direction you used when capturing the initial screenshot, or coordinates may be rotated 180 degrees!_garo.jpg)
3-Day Free Trial & Google Play Subscription
Includes a 3-Day Free Trial
New subscribers enjoy 3 full days of unlimited access for free. If you cancel within 3 days, no charges will ever occur.
Subscription Management & Auto-Renewal
Subscriptions automatically renew unless cancelled at least 24 hours before the end of the current billing cycle. You can manage, pause, or cancel your subscription at any time via your Google Play Store Account Settings. For full legal and refund terms, please consult our Terms of Service.